Gait Belt Product Review
Gait Belts
Welcome,
Learn How to Use a Gait Belt Properly, Why You Use Gait Belts, and the Best Gait Belt For Optimal Safety,Effectiveness, and Adjustment.
Gait Belt with Metal Buckle
I recently completed an online training course that included the use of a gait belt. According to the course, the gait belt should be placed “right under the ribs of the patient.”–EEEK you have to be kidding me!
If you are wondering why this makes me shriek, then let me explain 🙂
The diaphragm, the primary muscle used for breathing, is located RIGHT UNDER THE RIBS. Furthermore, to effectively use a gait belt, the belt must be securely tightened around the person. Therefore, if I were to follow the instructions provided in the online training course, I would be decreasing my patient/loved one’s ability to breathe by TIGHTLY securing the gait belt over the muscle responsible for breathing!
Breathing is one of the primary requirements of life. Personally, I prefer and demand my patients BREATH as easily and as deeply as possible–especially if he/she has a breathing disorder/disease such as Asthma, COPD (Chronic Obstructive Pulmonary Disease), or Emphysema–to decrease the risk of him/her losing consciousness while standing up or walking. Therefore, I teach ALL my patients and their caregivers, the most effective placement of a gait belt is as close to and over the bones of the hips as possible. In other words, try to secure the gait belt BELOW the belly button and on the boney area of the hips!
Whether you choose to use a gait belt or not to transfer/lift someone, you should know there are different types of belts available. Below is a basic product review of gait belts.
Product: Gait Belt
Price: $3.99 (Comfort Plus@SimplyMedical.com) up to $23.99 (Ebay.com)
Description: Width: 2″, Lengths vary depending on the waist/girth requirement (I use a 60″), Cotton with Metal Buckle
My Rating: 4 out of 5 stars
Why Use Gait Belts
Gait belts are used by many Health Care Providers around the lower waist of a patient to 1) provide a leverage point of contact for a “controlled descent” if a patient loses his/her balance, 2) decrease having to use a patient’s clothing or body part while transferring or lifting of a patient, and 3) reduce a cooperative/oriented patient’s anxiety associated with attempting a new skill such as walking after a surgery or transferring from the bed<>chair/wheelchair.
The Best Gait Belt For Optimal Safety,Effectiveness, and Adjustment
If a caregiver prefers and/or feels more confident using a gait belt for daily transfers, walking and home care, I firmly believe in using a metal clasp/buckle and a fabric (cotton)-based belt.
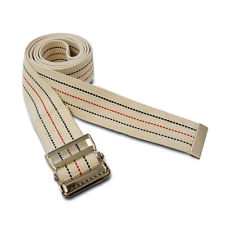
Metal Clasp Gait Belt
Plastic-buckles (aka side-release clasps) have a tendency to break and the plastic-coated webbing (wipeable gait belt) causes increased sweating when applied to the skin and is more difficult to keep in place around the lower waist–especially after a shower/bath when the skin is wet.
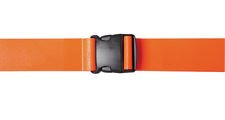
Vinyl Gait Belt with Plastic Buckle
Furthermore, tightening and securing the belt is more difficult because the vinyl either “slips” on itself or does not want to adjust readily to effectively accomodate various girth/waist sizes.
In comparison, the cotton belt is machine washable, wicks away sweat/moisture, and tends to stay in place against clothing/skin resulting in decreased “slipping of the belt up or down.” The metal buckle has “teeth” and are more durable/reliable as a securing mechanism when compared to the side-release plastic clasps, and those “teeth” allow for fast and easy adjustments around the hip area.
How To Put On A Gait Belt
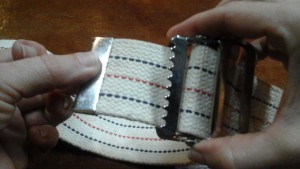
I always teach caregivers (both C.N.A’s and family members) to remember how you eat and that is how to put on a metal clasping gait belt. You “chew” with the teeth and then “swallow”. Therefore, take the end of the belt through the TEETH first (CHEW) and then loop it through the opening without teeth (SWALLOW).
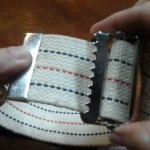
“CHEWING”
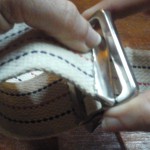
“SWALLOW”
Placing and Adjusting the Tightness
If you place the belt above the belly button, the belt is more likely to slip out of place. The reason for slipping out of place is simple. When you put on something tight, you generally take a deep breath in and hold it. Consequently, you are CHANGING the girth or size around the waist. The belt might be too tight or loose when you release your breath (exhale). In the same manner, I notice when I approach a patient with a gait belt, he/she tends to take in a large breath too. If I were to position the belt above the belly button, the belt would be tight/secure until the patient exhales. Once he/she exhales, the belt will be loose and slip up towards the armpits. If I secure the belt around the bones of the hips, the belt will remain tight regardless of my patient’s breathing pattern.
Ideally, the belt should be snug around the lower waist and NOT above the belly button. However, I never recommend the belt to be put over a colostomy bag, healing surgical incision or existing wound/injury site.
To tighten the Gait Belt simply pull the slack through the teeth area of the buckle first and take up the slack through the open end of the buckle. You should have just enough room for your fingers to go between the belt and the patient/loved one’s body. In other words, make sure the belt is tightly secured and there is minimal slippage!
Miscellaneous Uses
I have used a gait belt– secured in a figure 8 pattern– over the front of a rolling walker (RW) to help my patient maintain non-weight bearing restrictions. This technique should be taught by a PT in person, but it is effective when a patient is weak and can’t hold up his/her foot during transfers/walking.
In addition, a gait belt can be used to secure the lower leg on the elevating footrests of a wheelchair. Some patients with heavy casts or a great deal of swelling cannot keep his/her leg on the elevating pads and footrest of a wheelchair; therefore, I use a similar figure 8 pattern mentioned above and secure the leg on the footrest.
Finally, I have trained patients to loop his/her foot and ankle with a gait belt to help get a swollen/weak leg on and off the surface of the bed.
Gait belts are easy to use and can be used for a variety of patients, in different settings (home, hospital, nursing home), and for multiple purposes. However, I recommend caregivers receive appropriate gait belt training before using a gait belt for transfers, walking, and positioning of a lower leg.
I hope this information was helpful, and please feel free to leave a comment or contact me regarding any questions, ideas, or additional tips related to gait belt use/safety. As always, I am here to help you make daily home care easier and safer!
Best Regards,