Medical Recliner Lift Chairs… Overview & Recommendations

8 Comments
 What is the Best Power Lift Recliner Chair?  Learn The Advantages of Zero Gravity Lift Chairs (Recliners), What to Consider When Buying a Medical Lift Chair, and Safe Sit to Stand Transfer Techniques.

Product Description 

Zero Gravity Lift Chair

Zero Gravity Lift Chair


Medical lift recliners are becoming more and more common as well as popular in the home, nursing home, and assistive living setting.  Medical lift chairs are marketed to make standing up easier and safer.
Amenities include:
1) Varied position settings
•  such as Trendelenburg (feet are higher than the head- good for managing swelling of the legs)
•  zero gravity (reclined position with head slightly elevated, hip and knees slightly bent)
•  napping (reclined position with head slightly elevated but legs are straight)
•  seated (typical sitting posture with head up and hip/knees bent at 90º)
•  lift (adjusts to various heights of elevation for decreased effort during sit to stand transfer)
2. Massage with and without heat
3. Numerous colors and different material (leather, cloth) options
4. Various sizes (petite, wide, tall back, wide seat width, etc…)


Lift recliners require electricity (must be plugged into an outlet) and an operational motor(s)-some chairs lift up to 700 pounds against gravity and some have 2 motors that work independently to adjust the head and the legs.  There are 3 categories of lift chairs:


♦  2-position – has only one motor that simultaneously adjusts the head and footrest (when the head goes down for reclining the footrest simultaneously goes up).  The headrest or back of the chair only reclines slightly to approximately 15º. Therefore, when the footrest is up, the head is still elevated–this position is similar to the position of a reclined seat in a car or at a movie theater–you are technically reclined but your head is still elevated.
♦  3-position – has one motor as well BUT the headrest or back of the chair reclines up to 45º.  The head is still slightly elevated but not as high compared to the 2-position lift chair.
♦  Infinity/Zero Gravity – has 2, independently operating motors.  One motor operates the head/back of the chair, and the other motor operates the footrests.  Infinity chairs are the only medical lift chairs that offer the Trendelenburg and zero-gravity positions.


As a Physical Therapist, I focus and treat patients with the goal of improving overall strength, balance, endurance, and coordination for optimal safety and independence.  When I evaluate/treat a patient with a medical lift chair, I determine if he/she has the potential for standing without elevating the height of the recliner.  Some patients ultimately and conclusively MUST use the elevation feature of a medical lift chair to transfer due to rigidity/contractures (pronounced stiffness of several joints making the joints not move).  However, there is a hidden complication most consumers do not know about or even consider when deciding on a medical lift chair/recliner.


For Every Action, There is a Reaction….


Our bodies respond to the forces (resistance, gravity, nutrition, sleep) we put our bodies through.  For example, with increased resistance our bodies respond by building muscle mass and strength.  Through sitting around, staying in bed, or inactivity, our bodies become intolerant to activity, weak and fatigued.  In the same manner, if you constantly rely on the electricity of a medical lift chair to raise yourself up against gravity and stand, your legs become DEPENDENT on the electrical lift, weak, and eventually standing up from the toilet, wheelchair, surface of the bed, seat of a car–surfaces that DO NOT have electrical lifting options–becomes difficult and/or impossible.


As a Home Health Physical Therapist, I have 3 basic philosophies:  1) You are only going to get good at what you want or need to do SO you SHOULD practice what you want or need to do better, 2) Do not waste precious time on SILLY-LITTLE-EXERCISES (this is a major pet peeve of mine!), and 3) the resistance created by the weight of your body moving against the force of gravity, is the most important strength-building program in the home setting.  With these 3 principles in mind, let’s revisit the HIDDEN PROBLEM of the medical lift chair and relate it to my 3 basic concepts.

Like I stated previously, practice what you want and/or need to get better at doing. If standing up from a low chair or chair without armrests is difficult because of leg muscle weakness, then you would benefit from sit-to-stand exercises.


For instance, practice standing up using both hands to push yourself up AGAINST GRAVITY, then stand up using only one hand, and finally end up standing up only using your legs–LOOK MOM NO HANDS!!!!  In the case of the medical lift chair, I start my patients standing up from the recliner at the highest level of elevation he/she can safely and successfully can stand up using both his/her hands on the armrest, gradually decrease the degree of elevation until he/she can stand up from the recliner without relying on the medical lift mechanism, and end with standing up either using one hand on the armrest or no-hands on the armrest.  I have discovered, if my patients can stand up using only his/her legs (no hands), then he/she can stand up from the toilet, the seat of a car, the wheelchair, and the shower chair with decreased effort, loss of balance, and possible falls!


I can confidently surmise 95% of my patients do not have a problem keeping his/her balance, moving his/her arms and legs, or falling when he/she is SITTING DOWN.  On the contrary, 95% to 100% of my patients have a problem with his/her balance, moving his/her arms/legs and/or falling when he/she is STANDING UP.  Therefore, as a home-based physical therapist, I do not waste precious time doing sitting exercises or activities if my patients do not need to get any better sitting down moving his/her arms and legs.  Instead of sitting exercises, he/she needs to practice standing up from different surfaces as well as safely walking, pushing, pulling, lifting and carrying activities because those activities are what my patients want and/need to get better at doing in the home under the supervision of a SKILLED Physical Therapist.


 I DO NOT EVER, and NEVER will have my patients pedal a bike on the floor, do exercises in sitting with a theraband (usually a red, green, or yellow rubber band), or sit down while he/she moves his/her arms and legs with weights.  Why?  In my experience as a PT in the home, I have NEVER witnessed my patients stand up from different surfaces, walk safer/easier/farther, get up from the floor, or improve his/her standing balance as a result of SITTING DOWN and pedaling a bike for 20 minutes and/or SITTING DOWN and moving his/her arms against the ARTIFICIAL resistance of therabands/weights (in my opinion, these are SILLY-LITTLE-EXERCISES with no functional benefit).  Instead of these exercises, I use FUNCTION-FOCUSED exercises to improve the strength, standing balance and walking of my patients.


My Recommendation…Get Functionally Focused


Ultimately, I have nothing against medical lift chairs, BUT it is very important to remember for every action (becoming 100% DEPENDENT on the lift chair for standing up), there is a reaction (increased difficulty standing up from other surfaces).  If I were to recommend a medical lift chair, it would be the infinity/zero gravity because it is the only medical lift chair capable of achieving the Trendelenburg position which effectively elevates the lower extremities ABOVE the level of the heart for gravity-assisted lower extremity swelling management.


All medical lift chairs recline, but only the zero-gravity/infinity lift chair offers the Trendelenburg position for improved swelling management.  In addition, zero-gravity/infinity chairs offer a wider variety of positions resulting in improved pressure relief options.  A large portion of my patients prefers to sleep and spend more than 75% of their day sitting in their recliner for meals, watching television, etc… Frequent position changes reduce pressure on the tailbone (coccyx), shoulder blades, and heels resulting in decreased risk of developing pressure sores (bed sores).


I recommend treated-cloth upholstery over leather for easy cleanup, and decreased sweating, and skin breakdown associated with “sticking to the sitting surface.” Unfortunately, urinary incontinence is very common as well as dropping food and drinks. Having a surface such as scotch-guarded/treated upholstery makes clean up and disinfecting much easier.


I believe in versatility and getting as much bang for my buck; therefore, I recommend the medical lift chair that provides the most versatility/functionality without sacrificing comfort, quality of life, or level of independence.  I provided several options with prices from Amazon.  NOTE:  for approximately the same price, you can purchase a more versatile medical lift chair–more bang for your buck!


♥ For the purpose of full disclosure, I want you to know I am an affiliate partner with Amazon.  However, I wanted to provide the below illustrations for you to compare products and prices for each type of recliner.  Regardless of where you purchase a medical lift chair, be sure to purchase a chair that meets ALL of your loved one’s needs!


Take Advantage of Me and My Experience


When I provide images of related products, I am simply showing you some of the options available to address a particular situation.  However, if you have friend/relative give you medical equipment and you have a question about how to use, adjust, or set up the equipment, leave me a comment because I guarantee you are neither the first nor the last person to take on the responsibility of caring for someone that needs/would benefit from medical equipment but you’re just not sure what to get, how to set it up, or how to use it.

In the same manner, when equipment is delivered, sometimes the representative takes very little time to explain and demonstrate all the features, uses, and adjustments before leaving you with the equipment.  To that end, I say, “There is no such thing as a stupid question especially when it is the safety and comfort of you and your loved one hanging in the balance of falls and injuries in the home.”


I encourage you to browse, locate and ask questions before purchasing any medical equipment for the sake of you and your loved one’s safety and sanity.


2-Position Lift Chairs

3-Position Lift Chairs

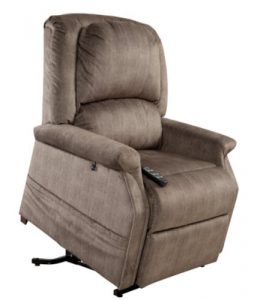
Infinity/Zero Gravity Chairs


Summary…Go for Versatility…Focus on Function…Practice to Be Better!


I am here to provide my opinion, tips, and tricks to help make caregiving easier and safer.  Here’s a video showing some tips and techniques for easier sit to stand transfers.  Please feel free to contact me, leave a comment or provide a suggestion.  I look forward to connecting with you soon.


Until Your Next Visit, Take Care and Be Safe,


Shawna PT, MPT


Categories: Product Reviews

Drive-Poly Fly Transforming Wheelchair: The 2-in-1 Solution

No Comments

Drive-Poly Fly Transforming Wheelchair

Description:

Seat Width: 16″, 18″ and 20″
Weight 19 lbs (using 8″ transport chair caster wheels) 29 lbs (using larger 24″ standard wheelchair wheels),
Removable armrests
Swingaway footrest
No tools required to convert from Transport to Standard wheelchair
Anti-tipping kit


My Rating: 5 out of 5 stars


Product Overview


The easy converting 2-in-1 wheelchair makes accessing narrow doorways possible with decreased overall expense and fall risk!

Many established/existing homes are built with narrow bathroom doorways (28-32″) and standard wheelchairs with the large wheels require >34″ clearance.  Until now, this common environmental barrier was solved by either incurring an expensive remodeling bill ($1500+), using less optimal/safe equipment or opting for sponge/bed baths.

Hiring a carpenter or construction company to enlarge an existing doorway or remove the door frame and re-plaster the new opening is very expensive!  I have known families to spend $1500 on a doorway remodeling project—GOOD GRIEF!

As a Home Health Physical Therapist, I have resorted to training patient’s and caregivers to use a rolling, office chair to access a bathroom if the doorway is too narrow and he/she does not have a transport wheelchair. Since rolling office chairs are in most homes, the family is not out a large additional expense.  However, transferring from a wheelchair onto a rolling office chair takes A LOT of training, patience, and time–definitely NOT my first choice but sometimes it is the only viable/temporary solution.

Transport wheelchairs have in-line casters designed for narrow doorways and tight spaces.  However, if you read my page on “WHEELCHAIRS,” you know I DO NOT RECOMMEND a transport wheelchair in the home primarily because 90% of transport wheelchairs are designed with non-removable/fixed footrests and armrests.  Transfers are more difficult and dangerous because the patient has to be LIFTED over the height of the armrests while simultaneously avoiding tripping/falling over the footrests.  Then there is the final option–reverting to sponge/bed bathing.


Sponge/Bed Bath Disadvantages


Sponge/bed baths REALLY do not APPEAL to me for several reasons.  First is the limited overall CLEANLINESS.  Think about it.  Your loved one has been sweating, possibly eating, and maybe even had to use the bed for toileting.  He/she needs a bath.  A basin of warm soapy water and another basin of warm rinsing water is brought to the bed.  The cloth is used on the body to remove the germs (possibly from a wound), grime, and feces. Then dunked repetitively back into the soapy now contaminated and dirty water–YUCK!!!  In addition, those basins of water cool off really quickly–so what was originally warm is now cold within 5 minutes of starting the sponge/bath process–Brrrr!!!

When your joints ache from arthritis, being sick, or working out, does a nice hot shower/bath help?  ABSOLUTELY – heat relaxes muscles!  Now imagine how good it feels when you can specifically target hot water on those achy, sore, tight areas—AHHH.  Well, your loved one is no different.  Using a hand-held shower head while sitting on a shower chair or tub transfer bench, the patient can hold/target the constant stream of hot water over his/her shoulders, knees, hips, neck while the caregiver washes his/her hair, back, and feet.  Ultimately, bathing in a tub/shower:

  1. promotes improved cleanliness as the germs, grime/feces wash down the drain,
  2. provides a steady heat source,
  3. utilizes the benefits of heat on muscles and joints, and
  4. encourages out-of-bed activity thereby reducing secondary risks such as blood clots, pressure/bed sores, pneumonia, and urinary tract infections.


PROBLEM/SOLUTION


So now back to the original problem, you have a narrow doorway and the wheelchair does not fit through the door!  The solution–the DRIVE POLY-FLY TRANSFORMING TRANSPORT WHEELCHAIR!  This is literally 2 wheelchairs (a transport wheelchair and standard wheelchair) in 1.  You get the convenience of using the narrow design to access the bathroom plus the mobility associated with the large-wheeled standard wheelchair designed for easily navigating ramps, uneven terrain (grass, gravel parking lots, dirt) in one piece of equipment that is easily converted without requiring any fancy tools!

When you consider the price of a fall, the increased effort and fall risk associated with traditional transport chairs–or even unconventional rolling office chairs, an expensive remodeling project, and the disadvantages of sponge/bed baths, you should choose anything that is more versatile, functional and safer.


Home care of a loved one often requires various specialized equipment, but when you can use one piece of equipment for more than one task–you win! I have provided a link to Ebay.com where you can get a DRIVE POLY-FLY WHEELCHAIR HERE for just over $300, but make sure you are purchasing the COMBO and the appropriate seat width because the wheelchair comes in 16″, 18″ and 20″ seat widths.


I hope this review was helpful and informative.  Please contact me with any questions, concerns or ideas regarding this post or any other ways I can help you make caregiving easier!


Sincerely,


Shawna PT, MPT

Gait Belt Product Review

No Comments

Gait Belts


Welcome,

Learn How to Use a Gait Belt Properly, Why You Use Gait Belts, and the Best Gait Belt For Optimal Safety,Effectiveness, and Adjustment.

Gait Belt with Metal Buckle

Gait Belt with Metal Buckle

I recently completed an online training course that included the use of a gait belt.  According to the course, the gait belt should be placed “right under the ribs of the patient.”–EEEK you have to be kidding me!

If you are wondering why this makes me shriek, then let me explain 🙂

The diaphragm, the primary muscle used for breathing, is located RIGHT UNDER THE RIBS.  Furthermore, to effectively use a gait belt, the belt must be securely tightened around the person.  Therefore, if I were to follow the instructions provided in the online training course, I would be decreasing my patient/loved one’s ability to breathe by TIGHTLY securing the gait belt over the muscle responsible for breathing!

Breathing is one of the primary requirements of life.  Personally, I prefer and demand my patients BREATH as easily and as deeply as possible–especially if he/she has a breathing disorder/disease such as Asthma, COPD (Chronic Obstructive Pulmonary Disease), or Emphysema–to decrease the risk of him/her losing consciousness while standing up or walking.  Therefore, I teach ALL my patients and their caregivers, the most effective placement of a gait belt is as close to and over the bones of the hips as possible.  In other words, try to secure the gait belt BELOW the belly button and on the boney area of the hips!

Whether you choose to use a gait belt or not to transfer/lift someone, you should know there are different types of belts available.  Below is a basic product review of gait belts.


Product:  Gait Belt

Price: $3.99 (Comfort Plus@SimplyMedical.com) up to $23.99 (Ebay.com)

Description: Width: 2″, Lengths vary depending on the waist/girth requirement (I use a 60″), Cotton with Metal Buckle

My Rating: 4 out of 5 stars


Why Use Gait Belts


Gait belts are used by many Health Care Providers around the lower waist of a patient to 1) provide a leverage point of contact for a “controlled descent” if a patient loses his/her balance, 2) decrease having to use a patient’s clothing or body part while transferring or lifting of a patient, and 3) reduce a cooperative/oriented patient’s anxiety associated with attempting a new skill such as walking after a surgery or transferring from the bed<>chair/wheelchair.

The Best Gait Belt For Optimal Safety,Effectiveness, and Adjustment


If a caregiver prefers and/or feels more confident using a gait belt for daily transfers, walking and home care, I firmly believe in using a metal clasp/buckle and a fabric (cotton)-based belt.

Gait Belt with metal buckle

Metal Clasp Gait Belt

 Plastic-buckles (aka side-release clasps) have a tendency to break and the plastic-coated webbing (wipeable gait belt) causes increased sweating when applied to the skin and is more difficult to keep in place around the lower waist–especially after a shower/bath when the skin is wet.

Vinyl Gait Belt with Plastic Buckle

Vinyl Gait Belt with Plastic Buckle

Furthermore, tightening and securing the belt is more difficult because the vinyl either “slips” on itself or does not want to adjust readily to effectively accomodate various girth/waist sizes.

In comparison, the cotton belt is machine washable, wicks away sweat/moisture, and tends to stay in place against clothing/skin resulting in decreased “slipping of the belt up or down.” The metal buckle has “teeth” and are more durable/reliable as a securing mechanism when compared to the side-release plastic clasps, and those “teeth” allow for fast and easy adjustments around the hip area.


How To Put On A Gait Belt  


I always teach caregivers (both C.N.A’s and family members) to remember how you eat and that is how to put on a metal clasping gait belt.  You “chew” with the teeth and then “swallow”.  Therefore, take the end of the belt through the TEETH first (CHEW) and then loop it through the opening without teeth (SWALLOW).


"CHEWING"

“CHEWING”

"SWALLOW"

“SWALLOW”

Placing and Adjusting the Tightness


If you place the belt above the belly button, the belt is more likely to slip out of place.  The reason for slipping out of place is simple.  When you put on something tight, you generally take a deep breath in and hold it.  Consequently, you are CHANGING the girth or size around the waist.  The belt might be too tight or loose when you release your breath (exhale).  In the same manner, I notice when I approach a patient with a gait belt, he/she tends to take in a large breath too.  If I were to position the belt above the belly button, the belt would be tight/secure until the patient exhales.  Once he/she exhales, the belt will be loose and slip up towards the armpits.  If I secure the belt around the bones of the hips, the belt will remain tight regardless of my patient’s breathing pattern.


Ideally, the belt should be snug around the lower waist and NOT above the belly button. However, I never recommend the belt to be put over a colostomy bag, healing surgical incision or existing wound/injury site.

To tighten the Gait Belt simply pull the slack through the teeth area of the buckle first and take up the slack through the open end of the buckle.  You should have just enough room for your fingers to go between the belt and the patient/loved one’s body.  In other words, make sure the belt is tightly secured and there is minimal slippage!


Miscellaneous Uses


I have used a gait belt– secured in a figure 8 pattern– over the front of a rolling walker (RW) to help my patient maintain non-weight bearing restrictions.  This technique should be taught by a PT in person, but it is effective when a patient is weak and can’t hold up his/her foot during transfers/walking.

In addition, a gait belt can be used to secure the lower leg on the elevating footrests of a wheelchair.  Some patients with heavy casts or a great deal of swelling cannot keep his/her leg on the elevating pads and footrest of a wheelchair; therefore, I use a similar figure 8 pattern mentioned above and secure the leg on the footrest.


Finally, I have trained patients to loop his/her foot and ankle with a gait belt to help get a swollen/weak leg on and off the surface of the bed.


Gait belts are easy to use and can be used for a variety of patients, in different settings (home, hospital, nursing home), and for multiple purposes.  However, I recommend caregivers receive appropriate gait belt training before using a gait belt for transfers, walking, and positioning of a lower leg.

I hope this information was helpful, and please feel free to leave a comment or contact me regarding any questions, ideas, or additional tips related to gait belt use/safety.  As always, I am here to help you make daily home care easier and safer!


Best Regards,


Shawna PT, MPT