| SWELLING BEFORE TREATMENT | SWELLING AFTER TREATMENT |
 |
 |
How to Decrease Excessive Swelling with 5 Easy Steps
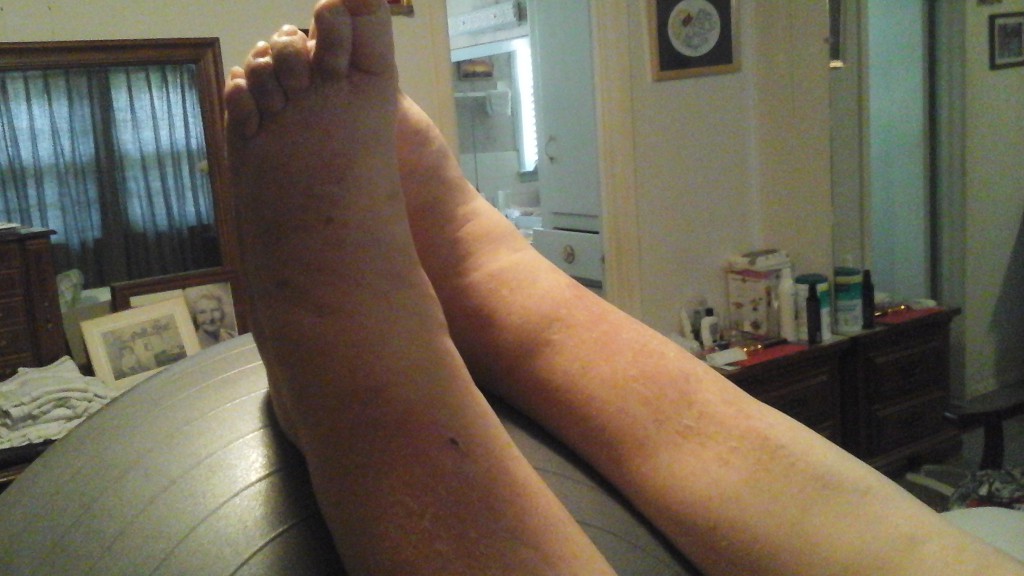
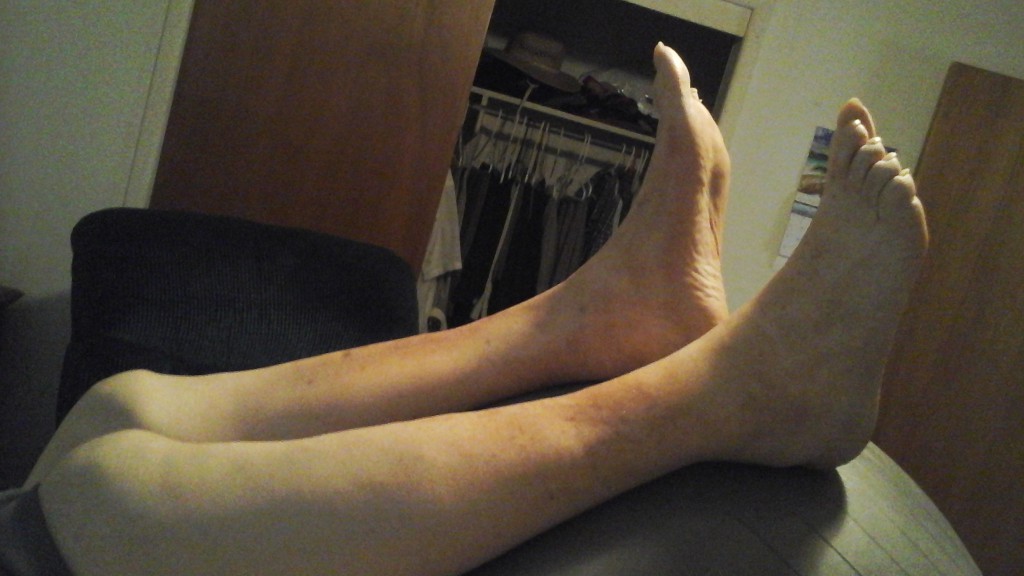
1. Elevation – for gravity to help decrease the swelling in the legs/arms, the part of the body most swollen and farthest from the heart (the feet/hands) has to be elevated ABOVE the level of the heart. If you have ever drained a waterbed, you used gravity to help you. The end of the water hose you secure to the waterbed mattress has to be higher than the other end of the water hose to allow the water to be drained using gravity. If you want/need the water to drain faster you could put your mouth on the the end of the water hose and suck on the lower end of the water hose until water comes out like a pump. Similarly to optimize the reduction of swelling in the ankle/foot/hand, the ankle/foot/hand has to be above the pump–the HEART. I prefer using an exercise ball (Swiss ball) to elevate feet/ankles above the level of the heart as pictured.
2. Range of Motion or Exercises – Combined with elevation, compression and/or a swelling massage, exercises also help decrease swelling. I often see patient’s doing ankle pumps. However, I recommend using ALL the movements of the ankles to improve circulation and reduce swelling. Therefore, I tell my patients to draw the ALPHABET with his/her ankles while I massage and/or keep the legs elevated for a minimum of 10 minutes.
3. 8 to 10 Minute Swelling Massage – very, very, very lightly run your spread out hands over the surface of the skin with the leg elevated to stimulate the drainage of fluid out of the foot/ankle
Process and Direction of the Massage:
- Before attempting/doing a swelling massage, I highly recommend you consult your loved one’s doctor to make sure it is safe for him/her to have a swelling massage
- Start the massage where the swelling is “blocking the exit toward the kidneys.” In other words, if the swelling involves the foot, ankle and the lower leg BELOW the knee, AND the knee is not swollen, you need to start the massage below the knee and get the fluid that is blocking the exit around the knee to move first. DO NOT start at the ankle/foot if the swelling is blocked further up the leg. You have to unblock the exit route first. When the extra fluid starts to move and the exit route through the knee is OPEN, then work your way down the leg toward the ankle and foot.
- REMEMBER: the purpose of the light massage is to move the swelling out of the leg toward the kidneys! So apply the VERY, VERY light pressure on the skin in the direction that you want the swelling to move (out of the ANKLE/FOOT and toward the Kidneys), and STOP applying the massage pressure when you reach the non-swollen portion of the leg.
- Once you reach the area of the leg that is not swollen (the knee joint), you pick up your hands, go back to the starting point before re-applying the light pressure massage again, and keep the flow of the swelling going in the proper direction.
- DO NOT push or apply the very light-pressure massage going in the opposite direction of the kidneys–For example: starting at the knee and going towards the ankle/foot–you are defeating the purpose of the massage and working against gravity!
4. EXERCISES After 10 Minutes of Elevation – I ALWAYS have my patients do 3-simple exercises after the massage:
1. 20 ankle pumps or draw the alphabet with his/her ankle
2. 20 knee bends (keep the leg elevated while bending and straightening the knee joint)
3. Finishing with 20 hip bends (lower the leg and then bend and straighten the hip joint)
NOTE: There is a purpose and specific sequence to the 3 exercises!!!
The exercise sequence (starting with the ankles and ending with the hips) is the same direction you want to move swelling out of the legs. Swelling (extra fluid) is not just under the skin, it is also in and around the muscle fibers. The above exercises activate the muscles, and the active muscle contractions help to SQUEEZE/WRING out the extra fluid in and around the muscle fibers–similar to squeezing/wringing water out of a sponge!
5. Compression – applying pressure is like sitting on the waterbed mattress to increase the drainage process. Generally, TED hose or Compression socks/stockings are best for applying symmetrical compression throughout the lower legs. I encourage you to visit my web-page, “6 Easy Steps for Putting on TED hose/Compression Socks,” to learn how to put on compression stockings/TED hose with decreased effort!
Here is a quick video demonstrating How To Put On Compression Socks/Hose Using a Plastic Bag!
SUMMARY
STEP 1: ELEVATION of the leg above the level of the heart
STEP 2: ANKLE ALPHABETS while the leg is elevated
STEP 3: 8 to 10 minute SWELLING MASSAGE with legs elevated
STEP 4: 3 EXERCISES (ankle pumps/alphabet, knee bends, hip bends)
STEP 5: COMPRESSION using compression socks/TED hose
Please feel free to continue reading for additional information explaining: the swelling massage, the different types of edema and how edema is rated.
What Does a Massage for Swelling Do?
Swelling can be painful and make activities such as lifting a leg onto the surface of a bed, walking, and getting in/out of tub or shower more difficult because of the extra “water”-weight in the legs, ankles and feet. The massage is designed to stimulate the draining/circulation of the lymphatic system. Simply explained, the lymphatic system is like our septic system and it dumps into the bladder to be flushed out of the body. This septic system is located right under the surface of the skin and is easily compressed/kinked. In fact, when you wear a tight pair of pants or socks and see the red marks and indention on the surface of your skin, you are seeing where the lymphatic system is compressed or “kinked.” Wrinkles in TED hose/compression socks or too much pressure to the surface of the skin will slow or stop the flow of the lymphatic system (septic system). In other words, having wrinkles and applying too much pressure on the surface of the skin is similar to taking a water hose and bending/kinking it–the flow of water is slowed down or stopped, the pressure builds up behind the bend/kink, and the result is increased swelling.
When I do a massage to decrease swelling, I always instruct my patients to wash the leg, apply lotions, and do exercises in the with the sequence and direction as the massage (start at the feet/ankles and work up towards the knees and hips). Furthermore, I recommend and encourage my patients to use compression socks/TED hose to keep the swelling from running back into the foot/ankle after bathing, applying lotion, and completing their Home Exercise Program (HEP) or their Physical Therapy treatment. These BEFORE and AFTER pictures depict how I used a swissball/exercise ball and the above swelling tips to decrease and manage swelling for one of my patients.
What is Swelling?
SWELLING, also known as EDEMA/EFFUSION, is a common problem associated with several different diagnoses such as: Diabetes, Total Hip/Knee Replacement, Congestive Heart Failure (CHF), Stroke/Cerebral Vascular Accident (CVA), Heart Attack (Myocardial Infarction-MI), etc…
Poor circulation or general trauma/abnormalities to the veins/arteries/lymphatic system associated with surgical procedures and/or the above mentioned diagnoses often results in a significant build up of fluids in the lower extremities–primarily below the knees and extending into the ankles/feet.
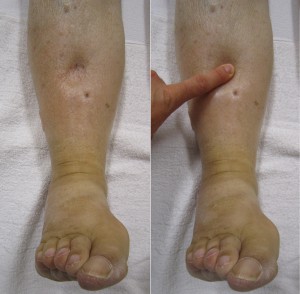
PITTING EDEMA
PITTING vs NONPITTING EDEMA
There are different types of swelling (pitting and nonpitting) and different levels of swelling. Pitting edema (As seen in the picture) is evident if the skin makes a visible indention (thumb print/finger print) when the thumb/finger is pressed down on the swollen area and held for a few seconds. When pitting is observed, the intensity or level of pitting is rated on a 1-4 scale. Generally, the level assigned to pitting edema depends on how long the indention remains visible once the pressure is released. For instance,
- +1 pitting edema = a visible indention can be seen > (greater than) 1 minute but < (less than) 2 minutes
- +2 pitting edema = the indention can be seen > 2 minutes but less than 3 minutes
- +3 pitting edema = the indention is visible >3 minutes but less than 4
- +4 pitting edema = the indention is visible >4 minutes
Untreated, the pitting can get worse and become WEEPING EDEMA. The skin weeps or is wet to the touch because the cells are overwhelmed with fluid (can’t hold any more fluid), and leak some of the extra fluid out onto the surface of the skin.
NON-PITTING edema is not as drastic and generally does not WEEP. Non-pitting edema is the type of swelling present if the thumb/finger impression is NOT visible after the pressure is removed. For example, you twist your ankle and the ankle gets swollen but if you press on the swollen area of the skin, the skin bounces back and there is no indention where you pressed your finger into the skin.
LOCALIZED vs SYSTEMIC EDEMA
In addition to the different types of edema, swelling can be described as LOCAL or SYSTEMIC.
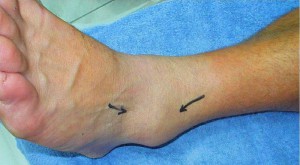
LOCAL Ankle Swelling
Local swelling means the swelling is isolated to a specific area (ankle, foot, knee, hand). Systemic means the swelling involves multiple sites/joints on the body (both legs/ankles/feet, abdomen, face and arms). So the worst kind of edema is SYSTEMIC combined with PITTING – especially if the PITTING is +2 or greater. I often treat PITTING/SYSTEMIC EDEMA with patient’s diagnosed with Diabetes, Congestive Heart Failure, and COPD or Chronic Obstructive Pulmonary Disease. Localized, pitting edema is bad because like I mentioned earlier, any type of pitting is bad compared to non-pitting, but I often treat patient’s with localized/pitting edema as the result of a recent surgery (hip/knee replacements).
Thank you again for visiting my website! I hope you learned something that will help you understand and manage swelling. Please feel free to leave a comment, contact me with any questions or comments about anything you might have learned, and/or topics you would like to learn from tipsfromapt.com. It will be my pleasure to reply and and personally address/answer all comments and questions.
I’m so glad that I arrived at this site today. I’ve been suffering from swollen ankles for quite some time now and never knew exactly how to combat this issue. I’m actually elevating my legs while typing this right now and I can already start to feel some of the relief in my ankles. When I’m done with the elevation I’ll try the range of motion exercises that you recommend. Thank you for the information!!
It is my pleasure! Be sure to have your knees above the level of your heart so the excess fluid from your ankles and feet does not “settle” into your knees. I am currently working on a video showing the swelling massage in action. I hope to have it ready in the next few weeks. You will know if the gravity is decreasing the swelling by looking for tiny wrinkles. Wrinkles are usually not what people like to hear, but if you are seeing tiny wrinkles the fluid is draining! Good luck and let me know how it goes!
Thank you so much I moved myself the last three days and my ankles swelled and i’m sore!
I am sorry you are sore and swollen. When you say ,”I moved myself” can you clarify. Maybe I can help.